- Published on
Redux Toolkit
- Authors
- Name
- Curtis Warcup


In this tutorial, we will learn how to use Redux Toolkit to write Redux logic. It follows along with the Redux Toolkit tutorial on the official Redux Toolkit website, but I will explain the code in more detail.
Installation
First, we need to install Redux Toolkit and React Redux.
npm install @reduxjs/toolkit react-redux
I like to keep all my code concerning Redux in a redux folder. So, I will create a redux folder in the src folder.
Creating a Redux Store
The store is the thing we create to pass data into our top level React component. If you used create-react-app, this would be the index.js.
Create a file in the redux folder called store.js. This is where we will create our Redux store.
// src/redux/store.js

import { configureStore } from '@reduxjs/toolkit'

export const store = configureStore({
  reducer: {},
})
Right now we have an empty object as the reducer. We will add a reducer later.
Now it is possible to have multiple reducers. We can add as many reducers as we want to the reducer object. Each reducer will be responsible for a different part of the state.
Provide Redux Store to React App
We need a way of passing all the data from the Redux store to our React app. We do this by wrapping our top level React component with a Provider component from React Redux.
Over in our main index.js file, we will import the Provider component and the store we created earlier.
// index.js
import ReactDOM from 'react-dom/client'
import App from './App'
import './index.css'
import { Provider } from 'react-redux' // Import Provider
import { store } from './redux/store' // Import the store we created earlier

const root = ReactDOM.createRoot(document.getElementById('root'))

root.render(
  <Provider store={store}>
    {' '}
    // Wrap the App component with the Provider component
    <App />
  </Provider>
)
Creating a Reducer as a Slice
Now this is where Redux Toolkit comes in. We can create a reducer as a slice.
A slice is a reducer and its actions. It is a way of grouping together related logic. This is where Redux Toolkit really shines. It makes it much easier to write Redux logic.
Create a folder in the redux folder called slices to store all our slices. Then create a file called counterSlice.js in the slices folder.
// src/redux/slices/counterSlice.js

import { createSlice } from '@reduxjs/toolkit'

const initialState = {
  value: 0,
}

export const counterSlice = createSlice({
  name: 'counter',
  initialState,
  reducers: {
    // `increment` is the action
    increment: (state) => {
      state.value += 1
    },
    decrement: (state) => {
      state.value -= 1
    },
    incrementByAmount: (state, action) => {
      state.value += action.payload
    },
  },
})

// Action creators are generated for each case reducer function
export const { increment, decrement, incrementByAmount } = counterSlice.actions

export default counterSlice.reducer
Notice the incrementByAmount takes an extra argument called action. This is where we can pass in data to the reducer. We will see how to do this later.

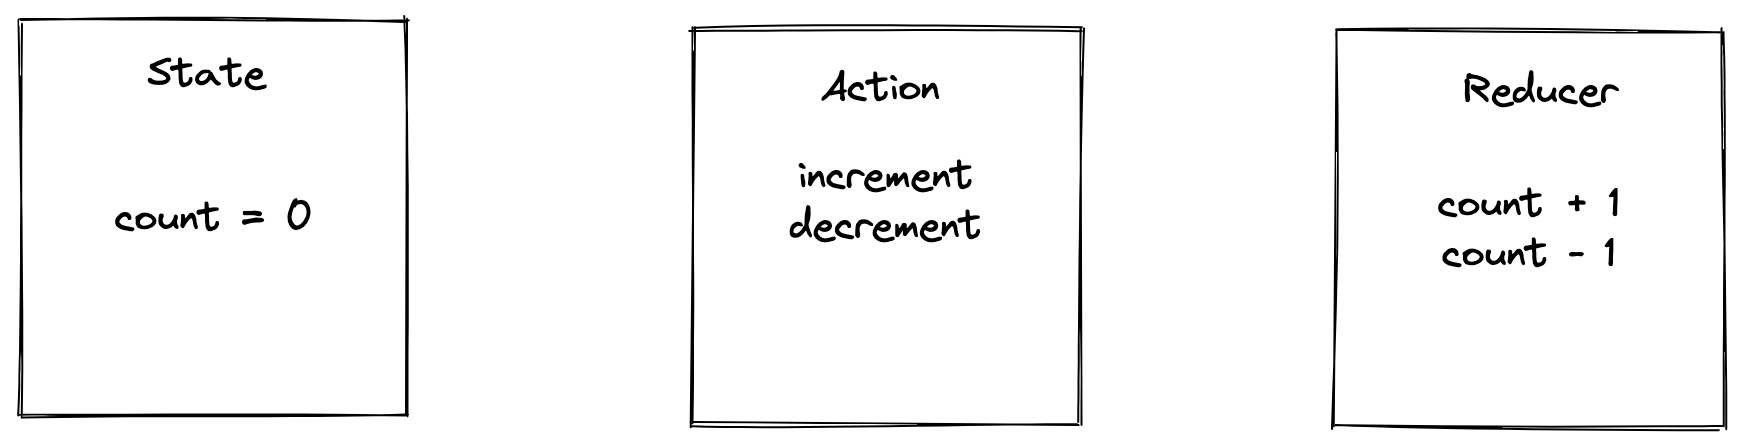
- State
- where we keep our variables
- where we define our initial state
- Actions
- are the things we call to change the state
- Reducers
- this is the actual function that does something to change the state
- it gets triggered by an action For example, whenever we call the
incrementaction, theincrementreducer will be called. Theincrementreducer will then change the state.
Exports from the Slice
We need to export the reducer from the slice. We do this by adding export default counterSlice.reducer at the bottom of the file.
Additionally, in order to access the actions, we need to export them as well. We do this by adding export const { increment, decrement, incrementByAmount } = counterSlice.actions at the bottom of the file.
We do this so we can call them in our react components.
Adding the Slice to the Store
We need to make sure the reducer is available to any component that needs it. We do this by adding the reducer to the reducer object in the store.js file.
Anytime we create a new slice, we need to add it to the reducer object.
// src/redux/store.js

import { configureStore } from '@reduxjs/toolkit'
import counterReducer from './slices/counterSlice' // Import the reducer

export const store = configureStore({
  reducer: {
    counter: counterReducer, // Add the reducer to the reducer object
    // add more reducers here if needed
  },
})
Using the Slice in a React Component
Getting the State into a Component
We can use the useSelector hook to get the state from the store into a component. This hook is provided by React Redux.
// src/App.js

import { useSelector } from 'react-redux' // Import the useSelector hook

function App() {
  const counter = useSelector((state) => state.counter.value) // Get the state from the store
  // or you can decompose the state
  // const { counter } = useSelector((state) => state.counter)

  return (
    <div className="App">
      <h1>Counter: {counter}</h1>
    </div>
  )
}
When we are using the useSelector hook, we pass in a function. This function takes in the state from the store as a parameter. We can then use that state in the function.
Remember, out store has a reducer object. The reducer object has a counter property. The counter property has a value property. So, we can access the value property by using state.counter.value.
Dispatching Actions - Increment and Decrement
Remember we exported the actions from the slice? We can use the useDispatch hook to dispatch actions to the store.
export const { increment, decrement, incrementByAmount } = counterSlice.actions
We want to be able to use these actions in our React components. We can do this by using the useDispatch hook.
// src/App.js

import { useSelector } from 'react-redux'
import { useDispatch } from 'react-redux' // Import the useDispatch hook
import { increment, decrement, incrementByAmount } from './redux/slices/counterSlice' // Import the actions

function App() {
  const dispatch = useDispatch() // Get the dispatch function

  const counter = useSelector((state) => state.counter.value)

  return (
    <div className="App">
      <h1>Counter: {counter}</h1>
      <button onClick={() => dispatch(increment())}>Increment</button> // Dispatch the increment action
      <button onClick={() => dispatch(decrement())}>Decrement</button> // Dispatch the decrement
      action
      <button onClick={() => dispatch(incrementByAmount(33))}> +33 </button> // Dispatch the incrementByAmount
      action
    </div>
  )
}
Summary
To checkout the full code, check out the example on Codesandbox here.