- Published on
QMK and VIA RGB Guide macOS
- Authors
- Name
- Curtis Warcup


0 responsibility on my part if you brick your board
Use this as a guide to configure your qmk map. Additionally if you just want to change rgb with keycodes you can use the qmk configurator.
Instal qmk_toolbox
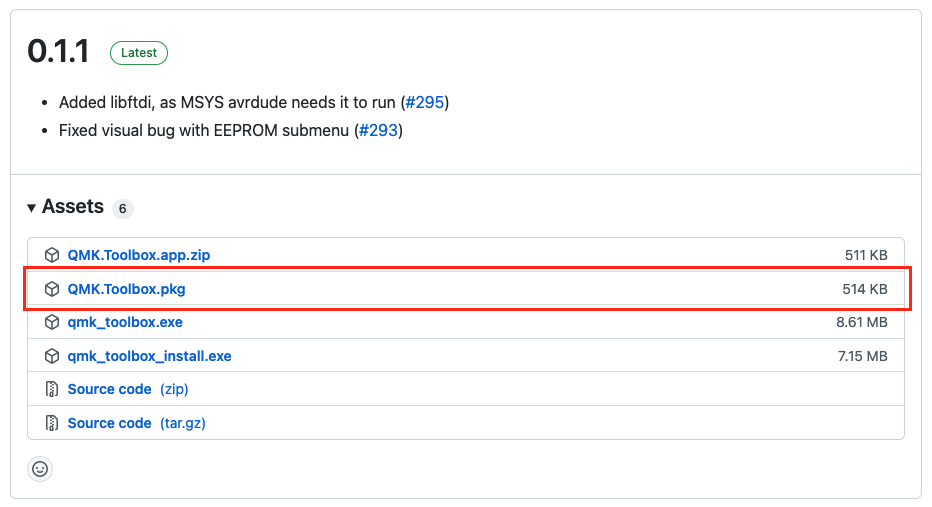
Download and install QMK here. Don't select the pre-released public beta. Use the latest version and under the assets tab, download the file named "qmk_toolbox.pkg". This file is for macOS. The other files are for Windows machines.
Once download is complete, launch terminal and enter the following command. If you don't know how to launch terminal, it can be found in Utility folder in Applications, or launch it by using spotlight.
qmk setup
Once the setup is complete, go to C:\users\your username\qmk_firmware. Do this in terminal by entering cd qmk_firmware.
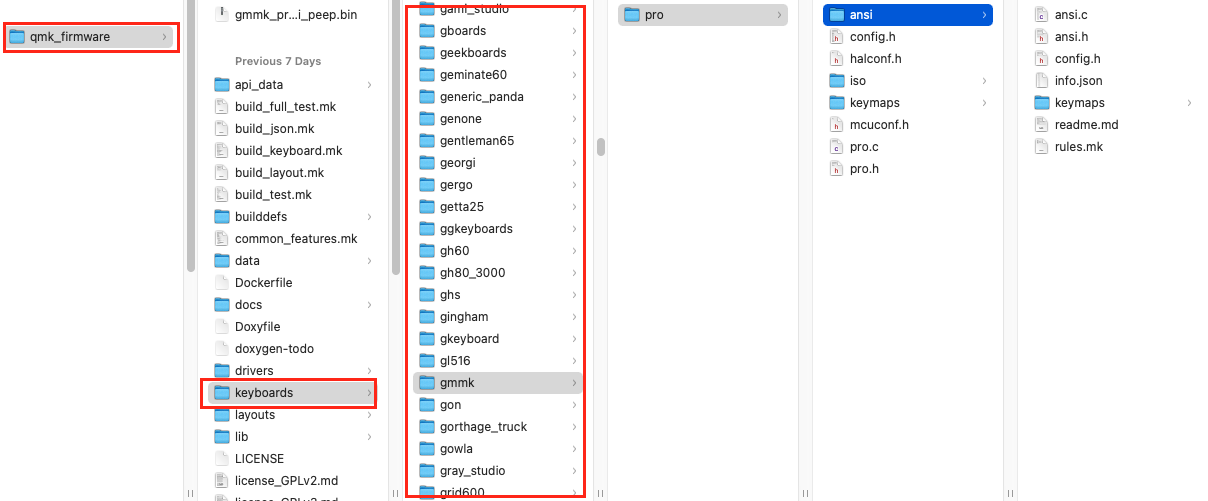
I recommend opening the file in Finder as well and double checking my board is compatible with QMK. This can be done by opening the qmk_firmware folder, going into keyboards and you should see your keyboard name listed here.
Now back to terminal. Once you are in the qmk_firmware directory, enter this into terminal but change the keyboard name, model and layout (ANSI or ISO). You can double check you are in this directory by seeing what is before the % character. It should look like <your user name on device> qmk_firmware %.
qmk config user.keyboard=<YOUR KEYBOARD NAME>/<KEYBOARD MODEL>/<LAYOUT>
For me, I'm using a GMMK Pro, ANSI keyboard. My terminal command is:
qmk config user.keyboard=gmmk/pro/ansi
If you're using the ISO version of the gmmk pro, paste this instead:
qmk config user.keyboard=gmmk/pro/iso
It will look like nothing was done, but that is correct. We will now create a custom keymap with this command:
qmk config user.keymap=<your keymap name>
For example, I renamed the folder to "noobs", therefore I enter...
qmk config user.keymap=noobs
Editing the Keymap
Open the keymap folder you previously renamed. In my case, "noobs".
In that folder you will find a filed named keymap.c. DO NOT RENAME THIS.
This is a file written in C and will be used to edit your keymap.
Now, you can use a fancy editor like Visual Studio Code, or just use the built in TextEdit application to open the keymap.c.
When defining a keymap each key needs a valid key definition. Keycodes can be found here
Code for rotary encoders can be found here
Do not forget to set a reset button if you have removed it from the keymap,standard is layer 1 pipe key/backslash (|)
- If you want to add additional layers, you can paste this into the 'keymap.c' file under the [0] = LAYOUT.
//ANSI
[X] = LAYOUT(
        _______, _______, _______, _______, _______, _______, _______, _______, _______, _______, _______, _______, _______, _______,          _______,
        _______, _______, _______, _______, _______, _______, _______, _______, _______, _______, _______, _______, _______, _______,          _______,
        _______, _______, _______, _______, _______, _______, _______, _______, _______, _______, _______, _______, _______, _______,          _______,
        _______, _______, _______, _______, _______, _______, _______, _______, _______, _______, _______, _______,          _______,          _______,
        _______,          _______, _______, _______, _______, _______, _______, _______, _______, _______, _______,          _______, _______, _______,
        _______, _______, _______,                            _______,                            _______, _______, _______, _______, _______, _______
    ),
// ISO
[X] = LAYOUT(
        _______, _______, _______, _______, _______, _______, _______, _______, _______, _______, _______, _______, _______, _______,          _______,
        _______, _______, _______, _______, _______, _______, _______, _______, _______, _______, _______, _______, _______, _______,          _______,
        _______, _______, _______, _______, _______, _______, _______, _______, _______, _______, _______, _______, _______,                   _______,
        _______, _______, _______, _______, _______, _______, _______, _______, _______, _______, _______, _______, _______, _______,          _______,
        _______, _______, _______, _______, _______, _______, _______, _______, _______, _______, _______, _______,          _______, _______, _______,
        _______, _______, _______,                            _______,                            _______, _______, _______, _______, _______, _______
    ),
- When switching to a layer make sure the key you are using as a layer switch(MO for example) is
kc_trnsor __, on the layer you are switching to in the keymap:
[0] = LAYOUT(
        _______, _______, _______, _______, _______, _______, _______, _______, _______, _______, _______, _______, _______, _______,          _______,
        _______, _______, _______, _______, _______, _______, _______, _______, _______, _______, _______, _______, _______, _______,          _______,
        _______, _______, _______, _______, _______, _______, _______, _______, _______, _______, _______, _______, _______, _______,          _______,
        _______, _______, _______, _______, _______, _______, _______, _______, _______, _______, _______, _______,          _______,          _______,
        _______,          _______, _______, _______, _______, _______, _______, _______, _______, _______, _______,          _______, _______, _______,
        _______, _______, _______,                            _______,                            _______, MO(1),   _______, _______, _______, _______
    ),                                                                                                     ^^layer switch                       ^^last key

    [1] = LAYOUT(
        _______, _______, _______, _______, _______, _______, _______, _______, _______, _______, _______, _______, _______, _______,          _______,
        _______, _______, _______, _______, _______, _______, _______, _______, _______, _______, _______, _______, _______, _______,          _______,
        _______, _______, _______, _______, _______, _______, _______, _______, _______, _______, _______, _______, _______, _______,          _______,
        _______, _______, _______, _______, _______, _______, _______, _______, _______, _______, _______, _______,          _______,          _______,
        _______,          _______, _______, _______, _______, _______, _______, _______, _______, _______, _______,          _______, _______, _______,
        _______, _______, _______,                            _______,                            _______, _______, _______, _______, _______, _______
    ),                                                                                                     ^^transparent key
Here is an example if what I used:
[0] = LAYOUT(
        KC_ESC,  KC_F1,   KC_F2,   KC_F3,   KC_F4,   KC_F5,   KC_F6,   KC_F7,   KC_F8,   KC_F9,   KC_F10,  KC_F11,  KC_F12,  KC_PSCR,          KC_MUTE,
        KC_GRV,  KC_1,    KC_2,    KC_3,    KC_4,    KC_5,    KC_6,    KC_7,    KC_8,    KC_9,    KC_0,    KC_MINS, KC_EQL,  KC_BSPC,          KC_DEL,
        KC_TAB,  KC_Q,    KC_W,    KC_E,    KC_R,    KC_T,    KC_Y,    KC_U,    KC_I,    KC_O,    KC_P,    KC_LBRC, KC_RBRC, KC_BSLS,          KC_PGUP,
        KC_CAPS, KC_A,    KC_S,    KC_D,    KC_F,    KC_G,    KC_H,    KC_J,    KC_K,    KC_L,    KC_SCLN, KC_QUOT,          KC_ENT,           KC_PGDN,
        KC_LSFT,          KC_Z,    KC_X,    KC_C,    KC_V,    KC_B,    KC_N,    KC_M,    KC_COMM, KC_DOT,  KC_SLSH,          KC_RSFT, KC_UP,   KC_END,
        KC_LCTL, KC_LALT, KC_LGUI,                            KC_SPC,                             KC_RALT, MO(1),   KC_RCTL, KC_LEFT, KC_DOWN, KC_RGHT
    ),

    [1] = LAYOUT(
        _______, _______, _______, _______, _______, _______, _______, _______, _______, _______, _______, _______, _______, _______,          _______,
        _______, RGB_TOG, _______, _______, _______, _______, _______, _______, _______, _______, _______, _______, _______, _______,          _______,
        _______, RGB_HUI, RGB_SAI, RGB_VAI, _______, _______, _______, _______, _______, _______, _______, _______, _______, RESET,            _______,
        _______, RGB_HUD, RGB_SAD, RGB_VAD, _______, _______, _______, _______, _______, _______, _______, _______,          _______,          _______,
        _______,          _______, _______, _______, _______, _______, _______, _______, _______, _______, _______,          _______, RGB_MOD, _______,
        _______, _______, _______,                            _______,                            _______, _______, _______, RGB_SPD, RGB_RMOD, RGB_SPI
    ),
As you can see the last key in the keymap does NOT require a comma at the end, please refrain from adding one as that tells the compiler that there's another key coming up!
Rotary Knob
Add the following code below the layouts section. The code below will only change the volume and mute when pressed.
#ifdef ENCODER_ENABLE
bool encoder_update_user(uint8_t index, bool clockwise) {
    if (clockwise) {
      tap_code(KC_VOLU);
    } else {
      tap_code(KC_VOLD);
    }
    return true;
}
#endif // ENCODER_ENABLE
LED - Capslock, Numlock and Scroll Lock Indicators
Paste this in the 'keymap.c' under the layout and knob:
void rgb_matrix_indicators_advanced_user(uint8_t led_min, uint8_t led_max) {
  if (IS_HOST_LED_ON(USB_LED_CAPS_LOCK)) {
    RGB_MATRIX_INDICATOR_SET_COLOR(index, R, G, B); //capslock key
  }
  if (IS_HOST_LED_ON(USB_LED_SCROLL_LOCK)) {
	  RGB_MATRIX_INDICATOR_SET_COLOR(index, R, G, B); // scroll lock key
  }
  if (!IS_HOST_LED_ON(USB_LED_NUM_LOCK)) {   // on if NUM lock is OFF
    RGB_MATRIX_INDICATOR_SET_COLOR(index, R, G, B);
  }
}
You can enter the values at index, R, G, B to target individual LEDs and their colors.
- index: index number used to target the LED.
- R, G, B: change values to change color.
Here is the layout of the LEDs and their respective index numbers on the board FOR ANSI:
// RGB LED layout

// led number, function of the key

//  67, Side led 01    0, ESC      6, F1       12, F2       18, F3       23, F4       28, F5       34, F6       39, F7       44, F8       50, F9       56, F10      61, F11      66, F12      69, Prt       Rotary(Mute)   68, Side led 12
//  70, Side led 02    1, ~        7, 1        13, 2        19, 3        24, 4        29, 5        35, 6        40, 7        45, 8        51, 9        57, 0        62, -_       78, (=+)     85, BackSpc   72, Del        71, Side led 13
//  73, Side led 03    2, Tab      8, Q        14, W        20. E        25, R        30, T        36, Y        41, U        46, I        52, O        58, P        63, [{       89, ]}       93, \|        75, PgUp       74, Side led 14
//  76, Side led 04    3, Caps     9, A        15, S        21, D        26, F        31, G        37, H        42, J        47, K        53, L        59, ;:       64, '"                    96, Enter     86, PgDn       77, Side led 15
//  80, Side led 05    4, Sh_L     10, Z       16, X        22, C        27, V        32, B        38, N        43, M        48, ,<       54, .<       60, /?                    90, Sh_R     94, Up        82, End        81, Side led 16
//  83, Side led 06    5, Ct_L     11,Win_L    17, Alt_L                              33, SPACE                              49, Alt_R    55, FN                    65, Ct_R     95, Left     97, Down      79, Right      84, Side led 17
//  87, Side led 07                                                                                                                                                                                                        88, Side led 18
//  91, Side led 08                                                                                                                                                                                                        92, Side led 19
For example, to target the LED under the capslock and make it red, the code would look like this:
void rgb_matrix_indicators_advanced_user(uint8_t led_min, uint8_t led_max) {
	if (IS_HOST_LED_ON(USB_LED_CAPS_LOCK)) {
        RGB_MATRIX_INDICATOR_SET_COLOR(3, 255, 0, 0); //capslock key
    }
}
3 is the index 255, 0, 0 is red
This is the ISO map:
// RGB LED layout ISO

// led number, function of the key

//  68, Side led 01    0, ESC      6, F1       12, F2       18, F3       23, F4       28, F5       34, F6       39, F7       44, F8       50, F9       56, F10      61, F11      66, F12      70, Prt       			   Rotary(Mute)   69, Side led 12
//  71, Side led 02    1, `~       7, 1        13, 2        19, 3        24, 4        29, 5        35, 6        40, 7        45, 8        51, 9        57, 0        62, -_       79, (=+)     86, BackSpc   		     73, Del        72, Side led 13
//  74, Side led 03    2, Tab      8, Q        14, W        20. E        25, R        30, T        36, Y        41, U        46, I        52, O        58, P        63, [{       90, ]}                     			   76, PgUp       75, Side led 14
//  77, Side led 04    3, Caps     9, A        15, S        21, D        26, F        31, G        37, H        42, J        47, K        53, L        59, ;:       64, '"       95, #        97, Enter     			   87, PgDn       78, Side led 15
//  81, Side led 05    4, Sh_L     67,\		     10, Z        16, X        22, C        27, V        32, B        38, N        43, M        48, ,<       54, .<       60, /?             		    91, Sh_R     94, Up    83, End        82, Side led 16
//  84, Side led 06    5, Ct_L     11,Win_L    17, Alt_L                              			   33, SPACE                              	  49, Alt_R    55, FN       65, Ct_R                  96, Left     98, Down  80, Right      85, Side led 17
//  88, Side led 07                                                                                                                                                                                                        		    	 89, Side led 18
//  92, Side led 08                                                                                                                                                                                                        			     93, Side led 19
VIA
Adding VIA support to your qmk keymap
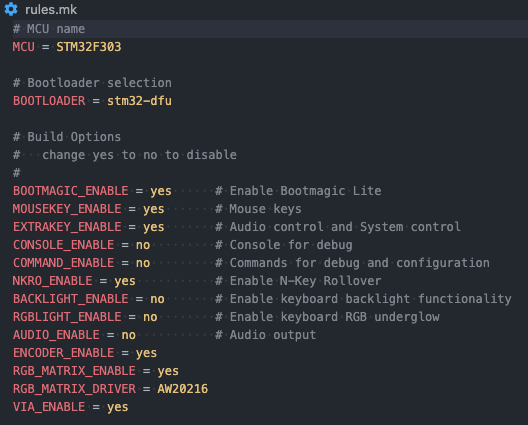
Copy the file named rules.mk in the qmk_firmware\keyboards\gmmk\pro\ansi to the folder of the keymap you are making. In my case, to the folder name "noobs". Remember, this is located in the qmk_firmware\keyboards\gmmk\pro\ansi\keymaps folder.
For ISO, qmk_firmware\keyboards\gmmk\pro\iso.
Add the following on the last line in the rules.mk file you copied to the folder of your keymap:
VIA_ENABLE = yes
Compile the Keymap
When you are done editing the keymap, save it and type this in to Terminal:
qmk compile
It will compile the keymap and put it in the qmk_firmware folder.
The new file will be called something like this: "gmmk_pro_ansi_noobs.bin"
Flashing the Keyboard
Launch QMK Toolbox.
Drag your newly created "gmmk_pro_ansi_noobs.bin" into the input area beside the "open" button. This is the path to your ""gmmk_pro_ansi_noobs.bin" file.
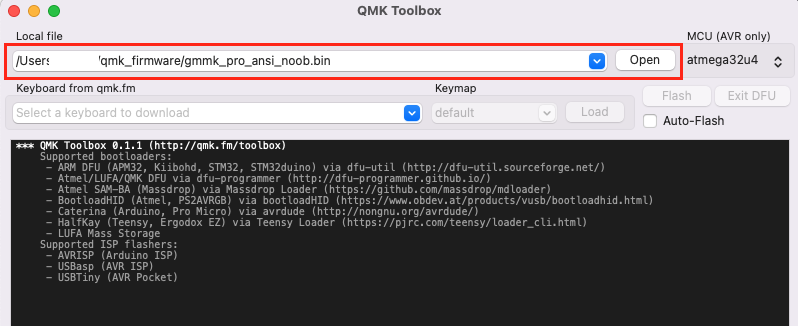
Hold spacebar+b on your GMMK Pro while plugging in the usb cable, this should put it into the bootloader mode. If that did not work, you can also try to hold ESC (top left corner) while plugging in the usb cable. You should see a message in the QMK Toolbox that indicates that your board is in STM DFU Bootloader Mode.
Now click flash on the top right and it will start flashing the firmware onto the keyboard.
Done!